How to Design Road Lighting Step by Step: Spacing, Direction, Software, and Safety
A professional engineering guide to the complete road lighting design workflow. This article covers road analysis, pole height, street light spacing, lux calculations, software simulations, and maintenance planning for safer, more efficient infrastructure.
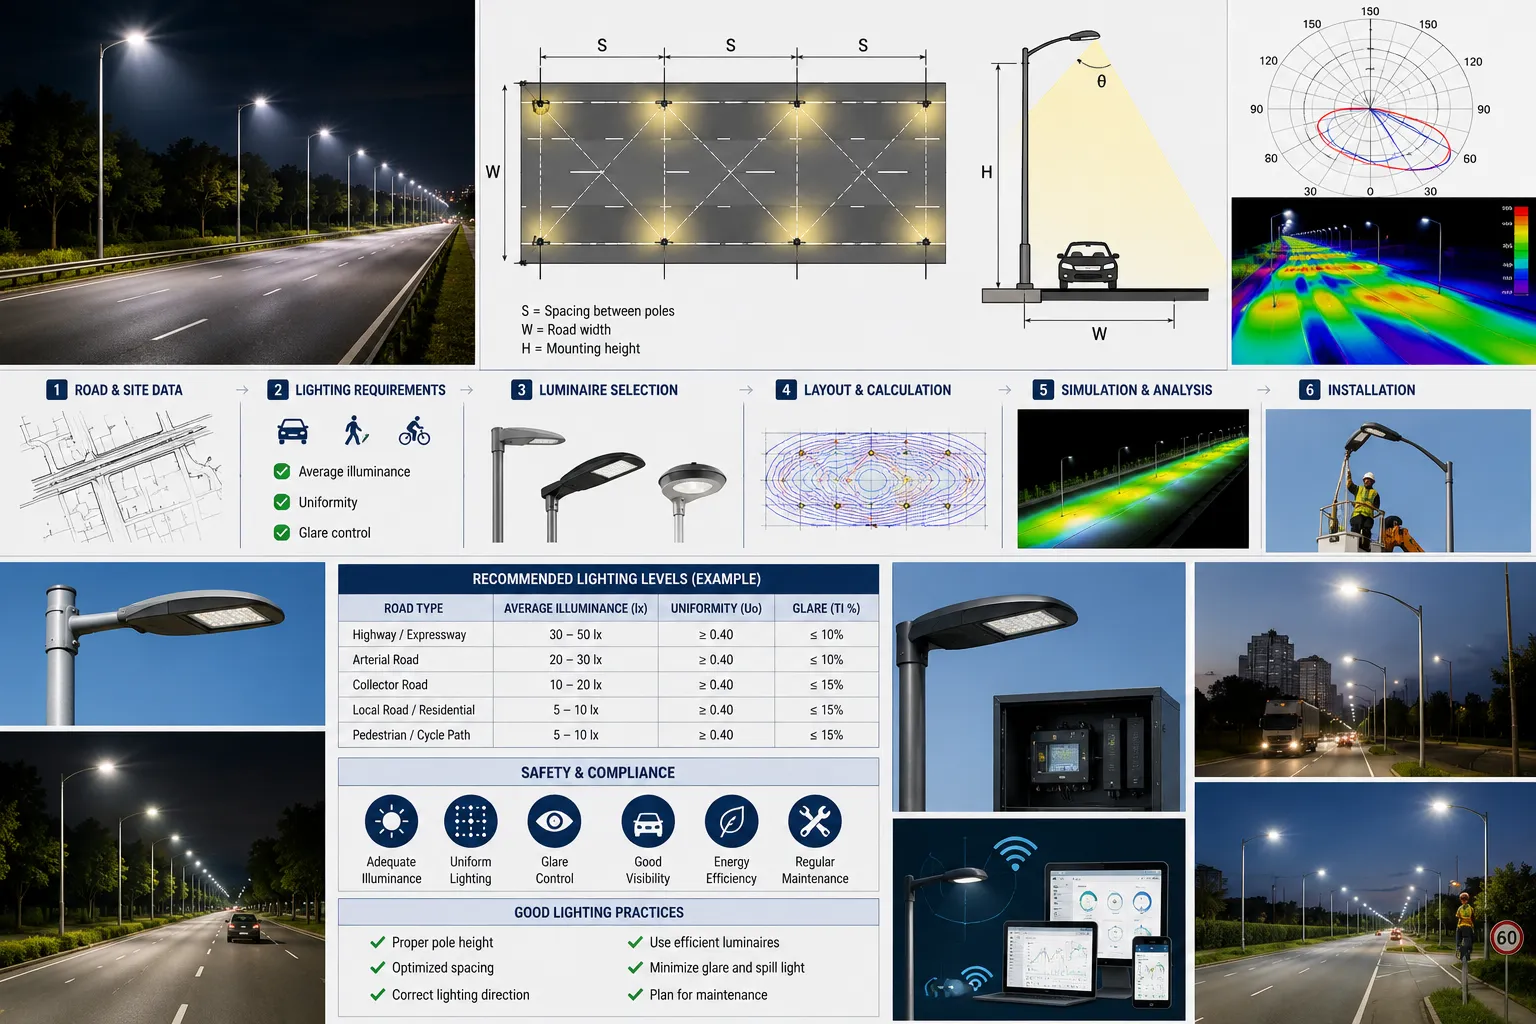
Why Road Lighting Is Critical for Safety and Efficiency
Poorly designed road lighting is more than an inconvenience; it is a critical safety failure. Inadequate illumination can dramatically increase accident rates, reduce driver and pedestrian visibility, create dangerous glare, and waste significant amounts of energy. A well-executed road lighting design is a fundamental component of modern infrastructure, directly contributing to traffic safety, crime reduction, and driver comfort during nighttime operations. This process involves a complex interplay of physics, engineering standards, and practical considerations to ensure every segment of a roadway is properly and efficiently illuminated.
Modern lighting engineering has evolved far beyond simply placing lamps on poles. Today, it incorporates sophisticated optics, energy-efficient LED technology, and intelligent control systems. Leading manufacturers offer a range of professional road lighting and smart street lighting solutions that form the backbone of these systems, enabling engineers to create safer and more sustainable urban environments. The goal is to provide the right amount of light, exactly where it is needed, without causing light pollution or excessive operational costs.
Understanding Road Classification for Lighting Design
The first step in any road lighting design project is to understand the classification of the road. Lighting requirements vary drastically based on the road’s function, traffic volume, and surrounding environment. Engineers typically categorize roads into several main types, each with unique design parameters:
- Highways and Freeways: Characterized by high-speed traffic and complex interchanges. Lighting design prioritizes long-range visibility for drivers, clear delineation of lanes, and minimal glare to prevent high-speed collisions.
- Urban Arterial Roads: These are major routes within cities, with high traffic density, frequent intersections, and significant pedestrian activity. The design must balance driver visibility with pedestrian safety, often requiring higher illumination levels and better uniformity.
- Collector Roads: These roads connect local streets to arterial roads. They have moderate traffic volumes and speeds. Lighting design focuses on ensuring safe navigation and visibility at intersections and crosswalks.
- Residential Streets: Low-speed, low-traffic areas where pedestrian safety and resident comfort are paramount. The design aims for sufficient visibility to prevent crime and accidents while avoiding light trespass into homes.
- Industrial and Commercial Zones: These areas often have heavy vehicle traffic, loading docks, and 24-hour operations. Lighting must be robust, reliable, and provide high clarity for safety and security.
- Parking Areas: Lighting design for parking lots focuses on facial recognition for security, eliminating dark spots between vehicles, and ensuring safe pedestrian passage to and from their cars.
Step 1: Road Geometry and Site Analysis
Before any calculations begin, a thorough analysis of the road's physical characteristics is essential. This data forms the foundation of the entire road lighting design. Key parameters include:
- Road Width: The total width of the paved surface, including all traffic lanes and shoulders.
- Number of Lanes: Determines the area that needs to be covered and influences pole placement.
- Medians and Islands: The presence, width, and type of median (raised, flush, depressed) dictate whether central or side-pole mounting is feasible.
- Intersections and Junctions: These are conflict points requiring higher illumination levels to help drivers and pedestrians identify hazards and navigate complex movements.
- Pedestrian Crossings and Sidewalks: Areas dedicated to pedestrians need specific vertical illumination to ensure they are clearly visible to drivers.
- Road Surface Type: The color and reflectance of the pavement (e.g., dark asphalt vs. light concrete) affect how much light is reflected, influencing the required lumen output from fixtures.
Step 2: Determining Appropriate Pole Height
Selecting the correct pole mounting height is a critical decision that impacts light distribution, uniformity, glare, and cost. Taller poles can illuminate larger areas, allowing for greater spacing, but they may also be more expensive and visually intrusive. The choice depends on the road classification and geometric constraints.
Pole Height Comparison
| Pole Height | Typical Application | Advantages | Limitations |
|---|---|---|---|
| 6 meters (approx. 20 ft) | Residential streets, pathways, parking lots | Lower glare, less light pollution, good for narrow areas. | Requires closer spacing, limited coverage area. |
| 8 meters (approx. 26 ft) | Collector roads, urban streets | Good balance between coverage and glare control. | May still require relatively close spacing on wider roads. |
| 10 meters (approx. 33 ft) | Urban arterial roads, minor highways | Wider light distribution, allows for greater spacing, cost-effective for larger areas. | Can create more glare if not properly shielded. |
| 12+ meters (approx. 40+ ft) | Major highways, interchanges, large industrial areas | Maximum coverage area, fewest poles required, efficient for wide multi-lane roads. | Higher initial cost, potential for significant glare, more difficult maintenance. |
Step 3: Calculating Street Light Spacing
Street light spacing is directly related to the pole's mounting height and the luminaire's light distribution pattern. The primary objective is to create continuous and uniform road illumination without dark spots or overly bright patches. The fundamental principle is that the light cones from adjacent poles must overlap sufficiently.
A common rule of thumb in preliminary design is that the spacing between poles should be approximately 3 to 5 times the mounting height. For example, for a 10-meter pole, a starting point for spacing might be 30 to 50 meters. However, this is a highly simplified estimate. Professional outdoor lighting calculation depends on the specific photometric data of the selected LED fixture.
Example: If a luminaire on a 10m pole has a forward throw that effectively illuminates up to 25 meters in front of it, placing the next pole 40 meters away ensures that the light patterns overlap, creating a consistent light level in the area between them. This overlap is crucial for achieving high lighting uniformity.
Step 4: Defining Required Lux Levels (Illuminance)
Illuminance, measured in lux (lumens per square meter), quantifies the amount of light falling on a surface. International and national standards, such as those from the Illuminating Engineering Society (IES) or the Commission Internationale de l'Éclairage (CIE), provide minimum required lux levels for different road classifications. These standards are based on factors like traffic volume, speed, and ambient light conditions.
Recommended Average Maintained Illuminance (Lux)
- Major Highways: 15–25 lux
- Urban Arterial Roads: 12–20 lux
- Collector Roads: 8–15 lux
- Residential Streets: 4–8 lux
- Intersections and Conflict Zones: 20–30 lux (or higher)
- Pedestrian Crossings: 20–40 lux (both horizontal and vertical)
These values are for 'maintained' illuminance, meaning they account for light loss over time due to dirt accumulation and LED lumen depreciation.
Step 5: Lighting Uniformity Analysis
High average illuminance is meaningless if the light is not distributed evenly. Poor uniformity creates a hazardous 'zebra effect' of bright and dark patches, which can strain a driver's eyes and conceal road hazards. Uniformity is a critical metric in road lighting design and is measured by the uniformity ratio (Uo).
- Average Illuminance (E_avg): The average lux level across the entire calculation grid on the road surface.
- Minimum Illuminance (E_min): The lowest lux level at any point on the calculation grid.
- Uniformity Ratio (Uo): Calculated as the ratio of minimum illuminance to average illuminance (Uo = E_min / E_avg).
Most standards require a uniformity ratio of 0.33 or 0.40, meaning the darkest spot on the road should be at least 33% or 40% as bright as the average. Achieving good uniformity requires careful selection of luminaire optics and precise spacing.
Step 6: Glare Control and Mitigation
Glare is excessive brightness that causes visual discomfort or a reduction in visibility. It is a major safety concern in road lighting design. There are two primary types:
- Disability Glare: Reduces the ability to see, such as when blinded by oncoming headlights. In road lighting, it can obscure pedestrians or hazards.
- Discomfort Glare: Causes annoyance or pain but does not necessarily impair vision. It leads to driver fatigue and distraction.
Glare is controlled through several methods:
- Fixture Positioning: Ensuring luminaires are mounted at the correct height and tilt angle.
- Optical Design: Using luminaires with advanced optics (lenses and reflectors) that direct light onto the road surface and away from drivers' lines of sight.
- Cutoff Classifications: Selecting fixtures with full-cutoff or semi-cutoff designs that prevent light from being emitted at high angles.
Step 7: LED Fixture (Luminaire) Selection
The choice of LED luminaire is central to the success of the design. Modern LED street lighting offers vast improvements over legacy technologies like high-pressure sodium (HPS). Key selection criteria include:
- Lumen Output (Lumens): The total amount of light emitted by the fixture.
- Power Consumption (Watts): The amount of energy the fixture uses.
- Efficacy (Lumens per Watt): The efficiency of the fixture. Higher efficacy means more light for less energy.
- Color Temperature (Kelvin): Typically 3000K (warm white) or 4000K (neutral white) for road applications. 4000K often provides better color rendering and perceived brightness.
- Optics/Light Distribution: Lenses that shape the light into specific patterns (e.g., Type II for long, narrow roads; Type III for wider roads) to match the road geometry.
- Ingress Protection (IP) Rating: Resistance to dust and water (e.g., IP66).
- Impact Resistance (IK) Rating: Resistance to physical impact.
Fixture Comparison Example
| Parameter | Fixture A (Standard) | Fixture B (High-Efficiency) |
|---|---|---|
| Power Consumption | 120W | 95W |
| Lumen Output | 15,600 lm | 15,200 lm |
| Efficacy | 130 lm/W | 160 lm/W |
| Optics | Type II Medium | Type III Short |
| Color Temperature | 4000K | 4000K |
While Fixture A has slightly higher lumen output, Fixture B is significantly more energy-efficient, offering substantial long-term operational savings.
Step 8: Energy Efficiency Optimization
Energy consumption is a major operational cost for municipalities. A key goal of modern road lighting design is to maximize efficiency without compromising safety. This is achieved through:
- LED Technology: LEDs are inherently more efficient, have longer lifespans, and offer better optical control than legacy sources.
- Smart Controls: Centralized Management Systems (CMS) allow for remote monitoring, scheduling, and dimming of individual or groups of street lights.
- Adaptive Lighting: Using sensors (e.g., motion or traffic counters), lighting levels can be automatically adjusted based on real-time conditions. For example, lights can dim to 30% power during low-traffic hours (e.g., 1 AM to 5 AM) and instantly return to full brightness when a vehicle or pedestrian is detected.
- Dimming Systems: Pre-programmed dimming profiles can reduce energy use during off-peak hours, extending the life of the components.
Step 9: Software Used for Road Lighting Design
Manual calculations are impractical for complex projects. Lighting engineers rely on specialized software to model and validate their designs. The workflow often involves multiple programs:
- AutoCAD/Revit: Used for the initial layout and site planning. Engineers import or create 2D/3D models of the roadway, including lanes, sidewalks, and pole locations. This forms the geometric base for the lighting simulation.
- DIALux or Relux: These are the industry-standard lighting design and calculation tools. The AutoCAD/Revit model is imported, and the engineer places virtual luminaires using photometric files (.ies or .ldt) provided by manufacturers. The software then simulates the light distribution and calculates key metrics like illuminance, uniformity, and glare across the entire site. This allows for iterative optimization of pole spacing, height, and fixture selection before any physical installation occurs.
Step 10: Maintenance Planning and Lifecycle Management
A road lighting design is not complete without a long-term maintenance plan. The plan ensures the system continues to perform as designed throughout its operational life. Key components include:
- Lumen Maintenance: LEDs slowly lose brightness over time. The design must incorporate a Light Loss Factor (LLF) to account for this, ensuring that illuminance levels never fall below the required minimum even at the end of the LED's life.
- Cleaning Schedules: Dirt, dust, and pollution can accumulate on luminaire lenses, reducing light output. Regular cleaning (e.g., every 2-5 years depending on the environment) is essential.
- Inspection Protocols: Regular visual and electrical inspections to identify physical damage, component failures, or changes in the surrounding environment (e.g., new tree growth blocking light).
- Replacement Strategy: Planning for the eventual replacement of luminaires at their end-of-life (often 15-25 years for modern LEDs).
Real-World Road Lighting Design Example: Urban Boulevard
Let's walk through a typical urban boulevard project.
- Road Geometry: A 15-meter wide road with two lanes in each direction, a 2-meter central median, and 3-meter sidewalks on both sides.
- Pole Selection: Due to the road width and the need for good coverage, 10-meter poles are selected for a central median mounting arrangement.
- Fixture Selection: A 140W LED luminaire with 18,000 lumens and a Type III light distribution is chosen for its wide throw, suitable for multi-lane roads.
- Spacing Calculation: Using DIALux, the initial spacing is set to 40 meters. The software simulation shows an average illuminance of 18 lux, which meets the requirement for an urban arterial road.
- Uniformity Verification: The simulation calculates a minimum illuminance of 7.8 lux. The uniformity ratio (Uo) is 7.8 / 18 = 0.43. This exceeds the minimum requirement of 0.40, indicating excellent, even lighting.
- Final Performance: The design is validated. The central arrangement with 10m poles spaced at 40m provides safe, uniform, and efficient illumination for both vehicles and pedestrians, with minimal light spill into adjacent properties.
Common Road Lighting Design Mistakes to Avoid
Even with advanced tools, errors can lead to poor outcomes. Common mistakes include:
- Excessive Spacing: Trying to save costs by spacing poles too far apart, resulting in dark spots and poor uniformity.
- Poor Pole Placement: Placing poles where they are obstructed by trees or street furniture, or creating conflicts at intersections.
- Ignoring Glare: Selecting fixtures with poor optics or incorrect tilt angles, creating hazardous conditions for drivers.
- Wrong Fixture Selection: Using a luminaire with an inappropriate light distribution pattern for the road geometry (e.g., using a narrow Type II optic on a wide road).
- Inadequate Lux Levels: Under-lighting a road to save energy, which compromises safety and violates standards.
Future Trends in Road Lighting
The field of lighting engineering is rapidly advancing, driven by smart city initiatives and IoT technology. Future trends include:
- Fully Adaptive Lighting: Systems that use AI and real-time traffic data from cameras and sensors to predict traffic flow and adjust lighting levels proactively, not just reactively.
- IoT Integration: Streetlight poles becoming hubs for smart city technology, hosting 5G nodes, environmental sensors (air quality, noise), public Wi-Fi, and security cameras.
- Solar-Powered Lighting: Advances in solar panel and battery efficiency are making off-grid solar street lighting a viable solution for areas without reliable access to electricity.
- Human-Centric Lighting: Adjusting the color temperature and intensity of light throughout the night to better align with natural circadian rhythms and reduce ecological impact.
Final Recommendations for a Successful Design
A successful road lighting design is a meticulous process that balances safety, efficiency, and cost. The priority must always be to provide adequate visibility for all road users. This is achieved through a deep understanding of road classifications, precise outdoor lighting calculation, and careful selection of modern LED street lighting technology. Energy efficiency should be pursued through smart controls and high-efficacy fixtures, not by compromising on required light levels.
Finally, robust maintenance planning is essential to ensure the system delivers its intended safety benefits for decades. By following a structured, step-by-step engineering workflow, designers can create lighting systems that make our roads safer, more comfortable, and more sustainable. For complex infrastructure projects, partnering with experienced engineering firms like Vision Constructors ensures that every technical detail is managed to the highest professional standard.
Frequently Asked Questions (FAQ)
How far apart should street lights be?
Street light spacing depends heavily on pole height and the luminaire's light distribution. A general rule of thumb is a spacing-to-mounting-height ratio of 3:1 to 5:1. For example, a 10-meter pole might have lights spaced 30 to 50 meters apart. However, this must be verified with photometric software like DIALux to ensure required illuminance and uniformity are met.
What lux level is required for roads?
Required lux (illuminance) levels vary by road type. Major highways typically require 15-25 lux, urban arterial roads 12-20 lux, and residential streets 4-8 lux. Critical areas like intersections and pedestrian crossings require higher levels, often 20-40 lux, to ensure maximum visibility.
Which software is used for road lighting design?
The industry standards for lighting calculation and simulation are DIALux and Relux. These programs use photometric data from manufacturers to create accurate 3D models of light distribution. Engineers often use them in conjunction with CAD software like AutoCAD or Revit, which are used for the initial site layout and geometric modeling.
How is lighting uniformity calculated?
Lighting uniformity is calculated as the ratio of the minimum illuminance to the average illuminance on the road surface (Uo = E_min / E_avg). A higher ratio indicates more even lighting. For most roads, a minimum uniformity ratio of 0.33 or 0.40 is required by engineering standards to prevent dangerous dark spots.
Why are LEDs preferred for road lighting?
LEDs are preferred for their high energy efficiency (more lumens per watt), long lifespan (often over 100,000 hours), and superior optical control. Their directional nature allows engineers to place light precisely where it's needed, reducing light pollution and glare. They also offer better color rendering, instant-on capabilities, and are compatible with smart control and dimming systems.