Construction Mock-Ups: When to Require and Approve Them
A well-planned construction mock-up is more than a sample panel. It is a controlled test of appearance, workmanship, interfaces, sequencing, and acceptance criteria before repetitive work begins.
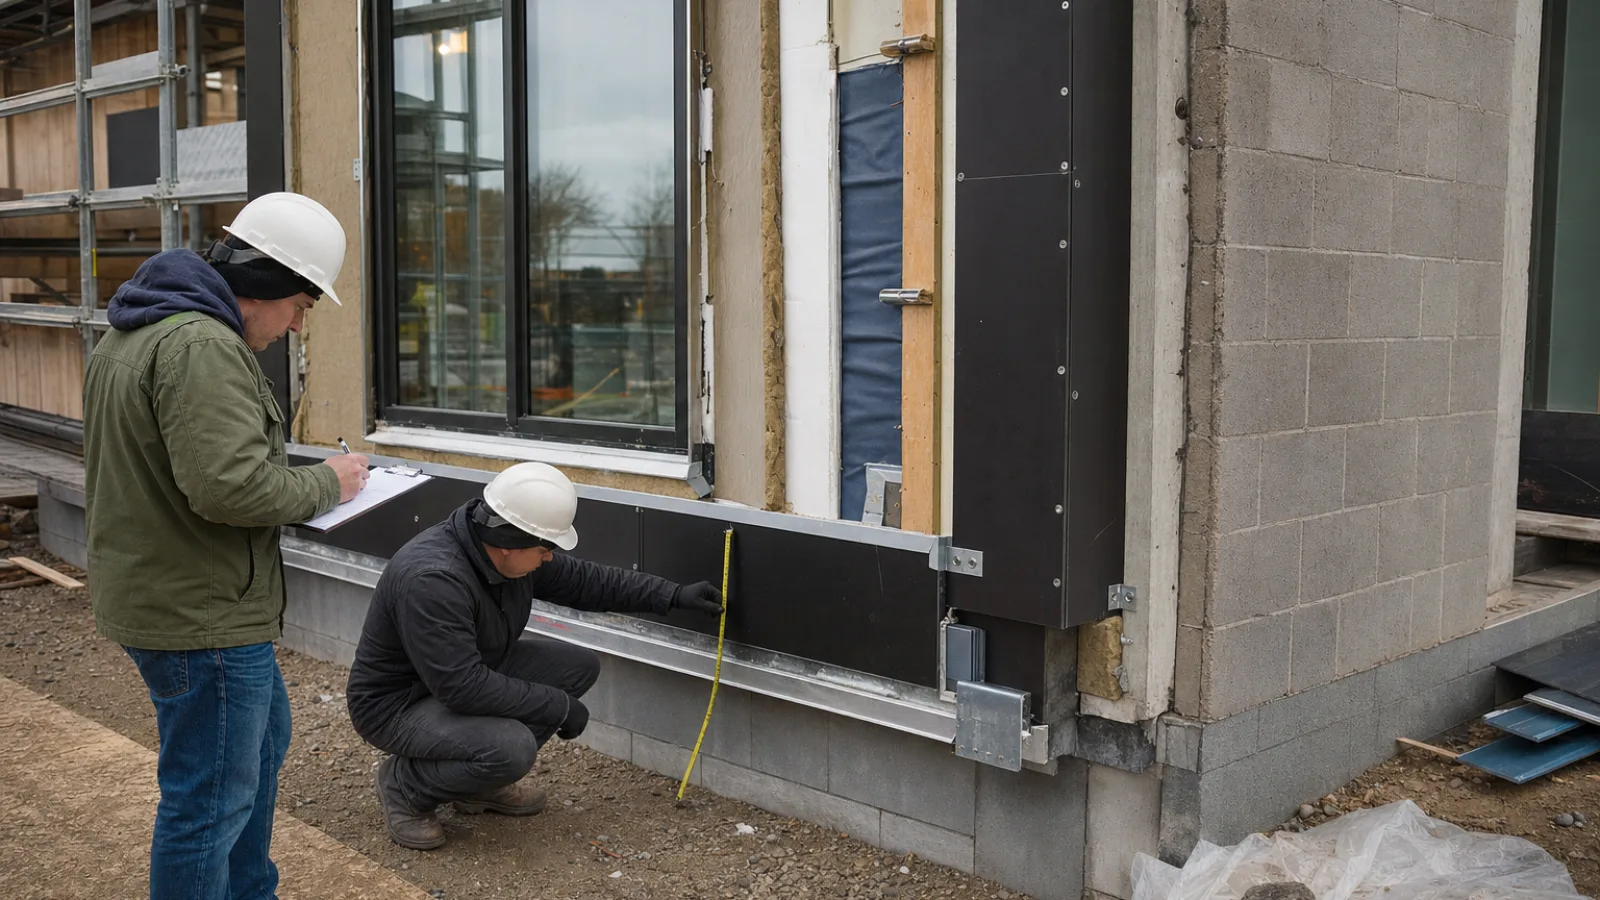
A construction mock-up is a controlled, representative installation built before a larger scope of work proceeds. It may be a small sample panel, a full-scale wall section, or a working assembly that includes several trades. Its purpose is not simply to display a finish. A properly planned mock-up lets the project team verify workmanship, appearance, interfaces, sequencing, and acceptance criteria while changes are still manageable.
That distinction matters on work involving sealants, waterproofing, windows, cladding, or other concealed and interdependent systems. Product selection and installation details should follow the contract documents and manufacturer requirements; relevant technical guidance, including Tremco construction sealant resources, can help teams coordinate sealant-related details. The mock-up then provides a project-specific reference for how those requirements are to be executed in actual site conditions.
The best mock-up becomes a quality benchmark for production. It records what was built, who accepted it, what conditions applied, and which details must be repeated. It should not become an isolated demonstration that field crews cannot reproduce.
What is a construction mock-up?
In commercial and residential construction, a mock-up is a physical representation of a material, assembly, detail, or installation method. It can be built on site, in a controlled fabrication area, or occasionally in a manufacturer’s facility. The required level of realism should match the risk and complexity of the work. A decorative finish may need a representative sample panel, while a building-envelope transition may require a near-full-scale assembly with actual substrates, fasteners, membranes, flashings, and penetrations.
These terms are related but not interchangeable:
- Material sample: A piece or small sample of a product, such as brick, stone, tile, flooring, paint, metal, or sealant color. It helps assess appearance and basic compatibility but says little about installation quality or interfaces.
- Assembly mock-up: A physical section showing multiple materials installed together. It may represent a façade bay, window opening, roof edge, wall-to-foundation transition, or interior finish assembly.
- Field mock-up: An installation built at the project site using the actual substrate, access conditions, tools, crews, and adjacent work where practical. It is particularly useful when site conditions affect sequencing or workmanship.
- Performance or testing mock-up: An assembly prepared for controlled testing, such as water penetration, air leakage, structural movement, adhesion, or other specified performance criteria. It may be separate from the appearance mock-up or combine both purposes.
A sample panel can establish color and texture, but it cannot by itself confirm that a window-to-wall transition can be installed, sealed, inspected, and tested. Conversely, a large performance mock-up may be unnecessarily costly for a simple interior finish. The specification should state what question the mock-up is intended to answer.
When should a project require construction mock-ups?
High-visibility or appearance-sensitive work
Require a mock-up when visual variation, alignment, or finish consistency could affect acceptance or the character of the project. Common examples include façades, masonry, stone, tile, architectural precast, millwork, metal panels, glazing, coatings, flooring, ceilings, and feature interiors.
The sample should show enough area to evaluate joint layout, coursing, reveals, transitions, edge conditions, color variation, texture, sheen, and alignment. For masonry or stone, a single unit is rarely enough to judge blending and joint consistency. For metal panels or rainscreens, the panel size, seams, corners, trims, fasteners, and adjacent materials may all influence the result. Viewing distance and lighting should be considered because a finish that appears uniform at close range may look inconsistent across a façade.
Complex interfaces and building-envelope work
Interfaces are among the strongest reasons to use a field mock-up. Window-to-wall interfaces, waterproofing transitions, roofs, flashings, curtain walls, rainscreens, thermal breaks, sealants, and penetrations often involve several trades and several layers of work. A detail that looks clear in a drawing may be difficult to execute when membranes, framing, insulation, clips, fasteners, and finishes occupy the same space.
A building envelope mock-up should represent adjacent systems together rather than showing each trade in isolation. It may need to include the window frame, rough opening, air barrier, water-resistive barrier, insulation, cladding, sill pan, head flashing, end dams, sealant joints, and a typical penetration. The objective is to verify continuity, drainage, access for installation, and the order in which the work will be completed.
Repetitive, high-consequence, or difficult-to-repair work
A mock-up is valuable before large quantities are installed or concealed when rework could affect the schedule, safety, access, occupied areas, or finished work. Repetitive scope magnifies small errors. A misplaced joint, inconsistent fastener pattern, inadequate substrate preparation, or incorrect membrane lap may be manageable in one location but expensive when repeated across hundreds of openings.
The case is even stronger where removal would damage adjacent work or require specialized access. A mock-up provides an opportunity to confirm tools, crew access, lifting methods, protection, and inspection points before production conditions become congested.
New materials, unfamiliar systems, or unresolved details
Use a mock-up when a material or system is new to the project team, when several products must work together, or when design details remain difficult to interpret. It can reveal constructability problems, tolerance conflicts, sequencing gaps, unsuitable substrates, and access limitations. It may also show that a proposed installation method is technically possible but too slow or inconsistent for production.
A mock-up is not a substitute for resolving incomplete design. Open design decisions should be identified before construction, and the mock-up should test an agreed detail rather than conceal uncertainty.
What should a mock-up include?
The mock-up requirement should define its location, dimensions, materials, substrates, fasteners, joints, accessories, adjacent assemblies, penetrations, finish conditions, and installation sequence. It should represent the actual means and methods as closely as practical. That includes substrate preparation, cleaning, priming, tooling, curing, protection, and weather conditions where those factors affect the work.
For example, a sealant joint mock-up should show the actual joint width and depth, backing material, bond-breaker conditions, primer if required, tooling method, adjacent finishes, and expected movement or exposure. A waterproofing mock-up should show laps, corners, transitions, terminations, penetrations, and the sequence used to integrate each layer.
| Mock-up type | Typical purpose | What to include | Main approval focus |
|---|---|---|---|
| Appearance sample | Establish visual character and finish quality | Representative materials, colors, textures, joints, edges, and adjacent finishes | Color, texture, sheen, alignment, variation, and viewing conditions |
| Interface or envelope mock-up | Verify continuity and coordination between systems | Actual or representative substrates, openings, membranes, flashings, insulation, cladding, sealants, and penetrations | Drainage, air and water control, sequencing, access, tolerances, and trade interfaces |
| Workmanship mock-up | Establish an installer's repeatable standard | Production tools, preparation methods, fasteners, joints, trims, protection, and finishing steps | Consistency, tolerances, neatness, preparation, and compliance with details |
| Performance mock-up | Evaluate specified functional performance | Test assembly, representative boundaries, instrumentation or test equipment, and documented procedures | Test results, failures, corrective actions, and conformance to specified criteria |
How to write clear mock-up requirements
Identify the responsible parties
The contract documents should identify who builds, coordinates, observes, tests, and approves the mock-up. The architect may lead appearance review; an envelope consultant may review continuity and detailing; the general contractor coordinates access and sequencing; and the subcontractor performs the installation. Manufacturers may advise on product preparation and compatibility, while a testing agency may conduct specified performance tests. The owner or client representative may participate in visual or functional acceptance.
Participation does not automatically equal approval authority. The contract should identify the person or entity authorized to issue the formal decision and explain how comments from other reviewers are resolved.
Set timing and hold points
Schedule the mock-up early enough to allow review, revisions, testing, procurement decisions, and production release. If approval occurs after materials have been ordered or crews have started repetitive work, the mock-up has lost much of its value.
Approval should be a defined hold point. Production of the affected scope should not proceed beyond the stated limit until the required decision is recorded. The schedule should also allow for curing, weather exposure, testing, and any destructive inspection that the specification requires.
Define acceptance criteria before installation
Acceptance criteria may include approved drawings, specifications, samples, tolerances, color and texture expectations, joint dimensions, alignment, substrate conditions, fastener spacing, finish quality, performance tests, and documentation requirements. Criteria should be measurable where practical. “Neat installation” is less useful than a description of acceptable joint profiles, exposed fastener alignment, edge treatment, or allowable variation.
The team should distinguish between a requirement, an approved project-specific deviation, and a preference raised during review. Unresolved preferences should not be recorded as final acceptance criteria without agreement from the responsible design authority.
State what happens after approval
Documents should state whether the mock-up remains in place, is dismantled, becomes part of the finished work, or is retained as a reference. If it will remain, its location and protection requirements should be identified. If it is removed, the project team should preserve photographs, marked details, material information, and any control samples needed for production.
Approval does not waive compliance with the contract documents, codes, manufacturer requirements, warranties, or required testing. A mock-up that contains a defect should not become an accepted defect merely because it was observed.
How to inspect and approve a construction mock-up
- Confirm the approved submittals and current drawings. Review the latest details, specifications, product data, color selections, installation instructions, and approved deviations before inspecting the work.
- Verify materials, products, batch information, and substrates. Confirm that the installed products match the approved submittals and record lot or batch information where color, formulation, or compatibility may vary.
- Inspect preparation and installation methods. Review substrate condition, cleaning, priming, cutting, fastening, lapping, tooling, curing, and protection. The method matters as much as the finished appearance.
- Review interfaces with adjacent trades and systems. Check transitions, clearances, drainage paths, movement joints, penetrations, terminations, and access for inspection and maintenance.
- Check appearance from realistic viewing distances and lighting conditions. Inspect from the elevations and occupied spaces where the work will normally be seen. Record whether temporary lighting, wet surfaces, or unusual viewing angles influenced the review.
- Perform required testing or controlled water exposure. Follow the specified procedure, equipment requirements, test duration, and reporting method. A visual review cannot replace a required performance test.
- Record comments, photographs, measurements, and responsible parties. Mark photographs and note locations so that comments can be understood without relying on memory.
- Issue approval, conditional approval, or rejection in writing. A conditional decision should list every open item, the responsible party, and the point at which the condition will be closed.
- Confirm how revisions will be incorporated into production. Update details, checklists, installation instructions, crew briefings, and inspection plans before releasing repetitive work.
Verbal approval and comments such as “looks good” are inadequate because they do not establish what was reviewed or what standard must be repeated. A written record protects all parties and gives field teams a usable reference.
What to document in the mock-up approval record
The approval record should identify the project, mock-up location, date, participants, weather or site conditions, and the scope represented. It should list the products used, manufacturers, lot or batch numbers where relevant, substrates, drawings, specifications, submittals, and installation instructions reviewed.
Include inspection findings, measurements, photographs, test procedures, test results, open items, approved deviations, and the decision status. Photographs are more useful when they are numbered, dated, oriented, and marked with arrows or dimensions. Record who is responsible for each correction and when the item must be closed.
Distribute the record to the architect, consultants, contractor, affected subcontractors, manufacturer representatives, testing agency, and client representatives identified by the project procedures. The final record should be stored with the quality documentation rather than left only in an email thread.
How to make the approved mock-up usable during production
Convert approval into a quality benchmark
Approval should produce practical field tools: approved photographs, marked-up details, inspection checklists, control samples, and concise installation instructions. Crew briefings can identify the accepted joint profile, alignment, preparation steps, protection measures, and interface details. Inspectors can use the same criteria when reviewing early production.
Protect the reference condition
An in-place mock-up should be protected from damage, contamination, weathering, unauthorized alteration, and use as a general work area. Marking it as a reference may be appropriate under the project’s procedures, but any sign or label should not damage the work. If the mock-up is removed, preserve records and representative samples before demolition.
Control changes and substitutions
A different product, installer, substrate, tool, sequence, or site condition may affect the accepted result. Changes should be reviewed through the project’s submittal and change-control process. A new mock-up or supplemental sample may be needed when the change affects appearance, compatibility, performance, or the ability to reproduce the approved condition.
Inspect the first production areas
Mock-up approval does not replace ongoing quality control or construction quality assurance. Inspect the first production areas against the approved standard before releasing full production. Early checks can identify drift in joint dimensions, color blending, fastener alignment, substrate preparation, or sequencing while correction is still practical.
Common construction mock-up mistakes
- Requiring the mock-up so late that materials, crews, or repetitive work are already committed.
- Making the sample unrealistically small or simple, so it does not show joints, corners, transitions, penetrations, or access constraints.
- Omitting interfaces and reviewing each trade’s work separately when the risk lies between systems.
- Using different materials, tools, installers, substrates, or preparation methods from those planned for production.
- Approving appearance without checking drainage, adhesion, air and water control, movement, or other specified performance.
- Failing to define viewing distances, lighting, weather, curing conditions, or acceptable variation.
- Treating conditional approval as final approval and allowing production to proceed with unresolved items.
- Failing to communicate the accepted standard to supervisors, installers, inspectors, and replacement crews.
Construction mock-up approval checklist
- Purpose and scope of the mock-up are defined.
- Location, dimensions, substrates, and adjacent systems are identified.
- Approved materials, products, colors, lot information, and accessories are verified.
- Actual or representative installation methods, tools, preparation, and sequencing are used.
- Interfaces, penetrations, terminations, joints, and transitions are included.
- Appearance, tolerances, workmanship, and viewing conditions are documented.
- Required testing, water exposure, curing, or destructive inspection is completed.
- Photographs, measurements, comments, and responsible parties are recorded.
- Decision status is issued in writing as approved, conditionally approved, or rejected.
- Protection, retention, dismantling, and production follow-up are defined.
Frequently asked questions
Are construction mock-ups required on every project?
No. Requirements depend on the contract documents, project risk, visibility, complexity, repetition, and consequences of failure. A simple, low-risk finish may need only a material sample, while a complex façade or waterproofing transition may justify a full field mock-up and performance testing.
Who approves a construction mock-up?
The contract should identify the approving authority. The architect, relevant consultants, contractor, subcontractors, manufacturers, testing agencies, and client representatives may participate, but their roles should be clear. The formal decision should come from the party authorized by the project documents.
Can a mock-up become part of the finished work?
It can if the documents permit it and the location remains acceptable. This should be confirmed before construction because a mock-up may use temporary supports, contain test cuts, or occupy an area that later work must modify.
Does mock-up approval mean the contractor is released from responsibility?
Generally, no. Approval establishes an accepted reference for the reviewed work, but it does not remove the obligation to comply with the contract documents, codes, warranties, manufacturer requirements, or good workmanship. Concealed conditions and ongoing production remain subject to inspection and correction.
When is a full-scale mock-up necessary?
Full-scale or near-full-scale construction is most useful when interfaces, sequencing, access, tolerances, movement, or performance cannot be judged from a small sample. It is especially appropriate for complex envelope assemblies, large openings, corners, roof transitions, and details involving several trades.
Conclusion
A well-planned construction mock-up is an early decision and quality-control tool, not a decorative display. Its value comes from realistic conditions, clear acceptance criteria, written decisions, and a deliberate connection to production inspections. Teams should define the purpose, include the interfaces that create risk, document measurable approval criteria, and carry the accepted standard into crew briefings and field quality control. Done properly, a mock-up turns uncertainty into a shared and repeatable standard before small errors become large-scale rework.